Commissioning
1. Install the HEMS
The HEMS needs to be installed in a location where it can make a wireless connection with all devices in the house as well as a wired connection to the router. A Powerline network adapter (ethernet over domestic mains) may be useful to create a wired connection to a suitable location. Note that the WiFi signal from a Shelly seems to be significantly stronger than that from an EmonEVSE.
Insert the SD card into the Raspberry Pi if not already installed.
Plug an ethernet cable from the HEMS to the householder’s internet router.
Plug the power supply into the HEMS and into a wall socket.
Note the WiFi password on the back of the HEMS
Ensure you can connect to the HEMS’s WiFi hotspot and reach the internet.
2. Immersion Controller
2.1 Initial Checks
The electrician should have left the relay on the ‘Auto’ setting during installation - visually ensure that this is the case. The controller will not operate unless it is set to ‘Auto’.
2.2 Connect Shelly to HEMS WIFI
Without the Shelly app
On the computer/phone look for WiFi network with SSID like ‘shellyem-XXXX’.
Connect to this network (no password should be required).
Navigate to 192.168.33.1 in a browser.
You should see the below screen or similar (can vary based on firmware version)…
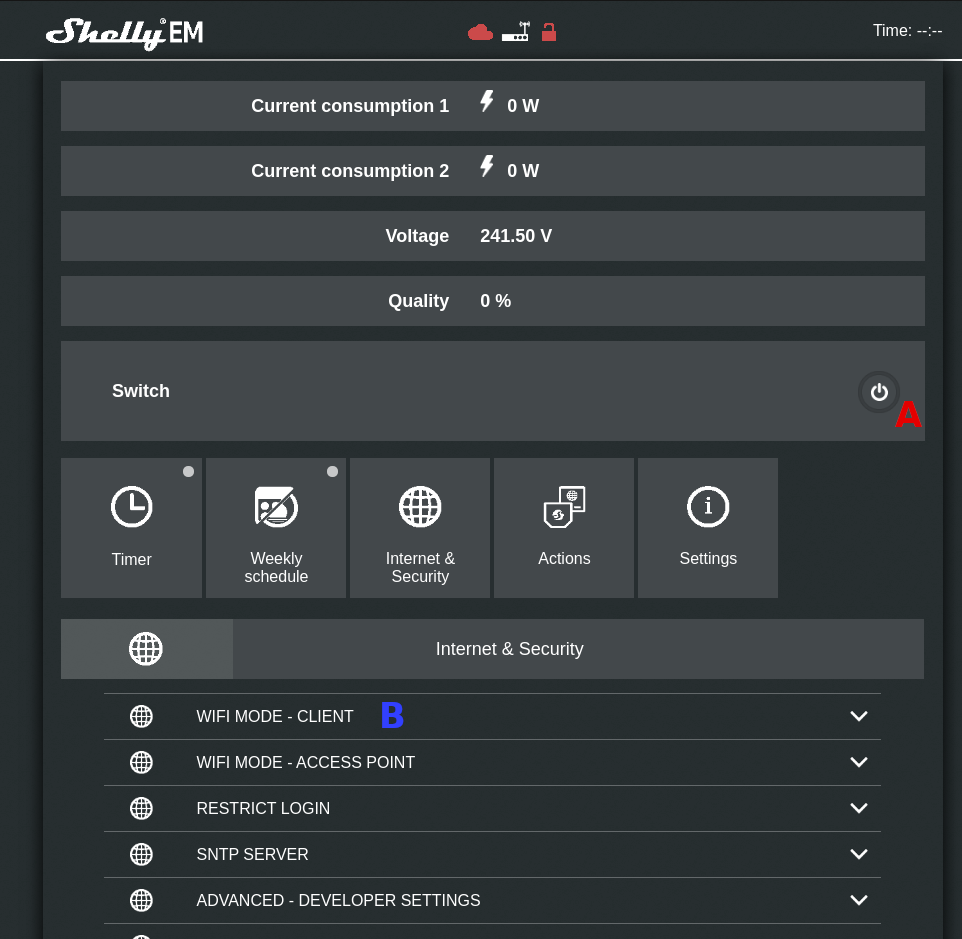
Verify that when you click the switch power icon (indicated with a red A) the relay activates by listening for an audible clunk from the relay.
Next, connect the Shelly to the HEMS WiFi network. Click on the ‘WIFI MODE - CLIENT’ drop down (indicated with a red B in the above screenshot).
Complete the details for the HEMS WiFi network in the fields highlighted in red below and click SAVE. It is worth ‘revealing’ the password using the eye symbol as a check to verify you have entered it correctly before hitting SAVE.
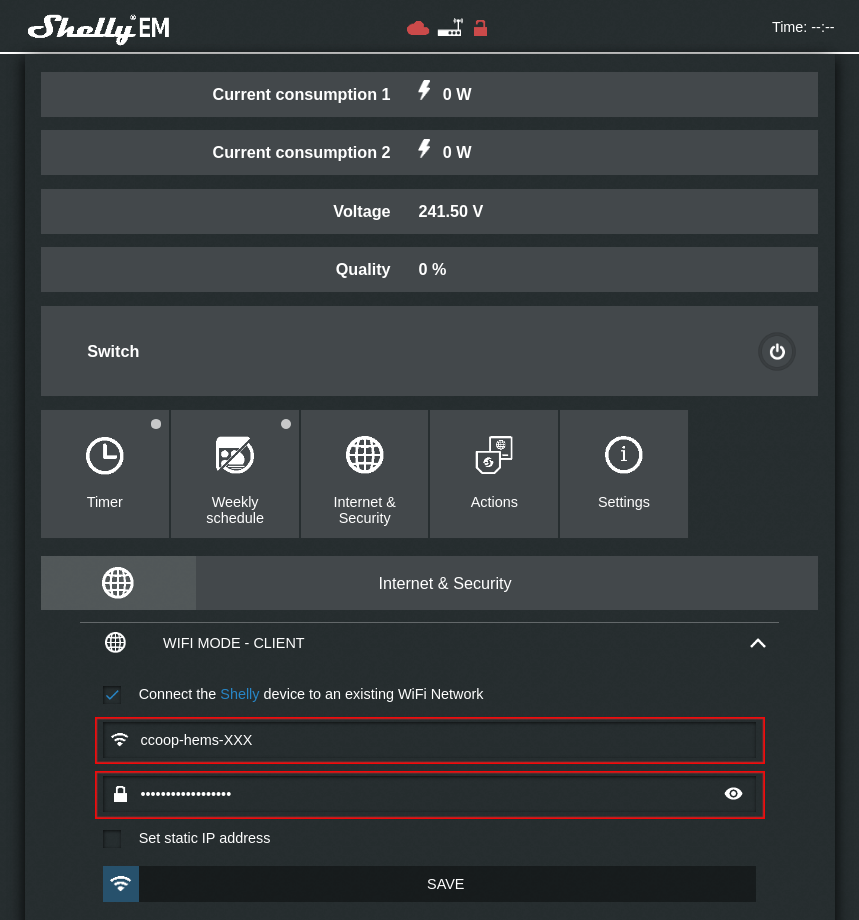
Click SAVE.
Now reconnect your laptop/phone to the HEMS WiFi network. The controller should have now connected to this network provided the details entered above were correct and the signal strength is sufficient. You now need to determine the IP address of the controller on this network - see below for instructions on this. Navigate to this IP address and confirm that the relay can still be controlled.
With the Shelly app
Connect your phone/tablet to the HEMS WiFi network
Open the Shelly app on your phone/tablet and navigate to Add Device
Follow the instructions to add the device to the HEMS WiFi network
Verify that when you click the switch power icon (indicated with a red A) the relay activates by listening for an audible clunk from the relay.
Now reconnect your laptop/phone to the HEMS WiFi network. The controller should have now connected to this network provided the details entered above were correct and the signal strength is sufficient. You now need to determine the IP address of the controller on this network - see below for instructions on how to do this. Navigate to this IP address and confirm that the relay can still be controlled.
Find the IP Address of the Shelly
This can be done using a network scanner such as arp-scan or nmap on Linux, or any number of other tools, including mobile apps like Network Discovery for Android or Network Analyzer Lite. Note that we have not tested and are not endorsing these apps! You will need to connect your phone to the HEMS WiFi hotspot to use a mobile app.
Using nmap (this command will always be the same as the network of the HEMS is fixed):
$ nmap -sP 10.42.0.*
Starting Nmap 7.80 ( https://nmap.org ) at 2020-06-24 17:53 BST
Nmap scan report for 10.42.0.1
Host is up (0.020s latency).
Nmap scan report for shellyem-B9EEAE (10.42.0.23)
Host is up (0.042s latency).
Nmap scan report for 10.42.0.72
Host is up (0.046s latency).
Nmap scan report for minerva (10.42.0.129)
Host is up (0.00041s latency).
Nmap done: 256 IP addresses (4 hosts up) scanned in 12.63 seconds
In the above output you can see the shellyem device is (in this case) IP 10.42.0.23.
2.3 Update Firmware on Controller
If a firmware update is available then update the controller via the Shelly’s HTTP interface. It should be finished within 30 seconds. If it takes more than 5 minutes you may have a problem!
2.4 Connect Controller to MQTT Broker
Using the IP determined in the previous step you should now access the ShellyEM UI again (note that in completing this step you are verifying connectivity of the ShellyEM to the secure network).
Click ‘Internet & Security’ > ‘Advanced - Developer Settings’
Enable the MQTT mode by ticking the ‘Enable action execution via MQTT’.
In the ‘Server’ field enter
10.42.0.1:1883.
The ShellyEM should at this stage have acquired the time automatically through the network and you can verify this by looking in the top-right corner where the current time is displayed. If it is not shown then the Shelly is having an issue acquiring the network time.
2.5 Configure Default Schedule
The ShellyEM needs to be connected to the internet for this to work.
(Settings as below unless otherwise advised).
ON at 1am.
OFF at 6am.
2.6 Configure AUTO OFF setting
This acts as a fallback to above which does not rely on the ShellyEM being connected to the internet.
Set to 21600 (=6 hours).
Checklist
Connect controller to HEMS WiFi network.
Update firmware (if available).
Configure MQTT.
Configure default schedule.
Configure AUTO OFF.
Troubleshooting
If the ShellyEM fails to connect to the HEMS WiFi network it will revert to AP mode.
It is possible to reset the controller but it needs to be removed from the casing. It’s mounted on a DIN rail insert with a cut out for the reset button. This should only normally be done by an electrical installer.
3. EmonEVSE
The EmonEVSE shares a software platform with the OpenEVSE. Full instructions on this are available at http://files.openenergymonitor.org/datasheet/EmonEVSE-datasheet.pdf (PDF).
3.1 Initial Checks
The EmonEVSE should be powered up and awake. Check that single presses of the button will successfully send the device into sleep mode (display goes purple) and wake it up again (display green).
3.2 Connect EVSE to HEMS WiFi
On first boot, OpenEVSE should broadcast a WiFI access point (AP) OpenEVSE_XXXX. Connect to this using the default password openevse and navigate to http://192.168.4.1 in a web browser. The EVSE should present you with a list of visible WiFi networks which includes the HEMS WiFi network. If not, you will need to move the HEMS closer to the EVSE. If so, connect to the HEMS network. The EmonEVSE should restart and display its new IP address briefly as it boots up.
3.3 Update firmware
Reconnect to the HEMS WiFi and download the latest firmware.bin from https://github.com/OpenEVSE/ESP32_WiFi_V3.x/releases.
Navigate to the EmonEVSE’s IP address (if you did not manage to catch this from the display, see above for use of tools to scan the local network). Under the ‘System’ tab upload the firmware file that you have downloaded to the WiFi Firmware update form. The system should restart and you should see the version number change.
3.4 Connect MQTT
The EmonEVSE needs to be connected to the MQTT server on the HEMS. Navigate to the Services tab and enable MQTT control. Under the Host field enter the IP address of the HEMS (do not copy the https:// protocol into this field). The username and password should be blank and the topic should be the EVSE ID (e.g. openevse-1a23). After saving these details you should see “Connected: Yes”.
Checklist
Connect EmonEVSE to HEMS WiFi network.
Update firmware
Configure MQTT.
Test control.
4. Home Assistant
While connected to the HEMS WiFi, navigate to 10.42.0.1. This will give you access to the Home Assistant application. On first use you will set up a user account. Set the username to the be SSID of the HEMS’s WiFi hotspot, and use the WiFi password (from the back of the HEMS) as the password for this account.
4.1 PowerShaper Integration
During the Home Assistant first run setup, you will be asked to enable integrations.
Search for the PowerShaper integration and type the shortcode from the jobsheet into the box.
4.2. Test device control
You should now be able to control all devices from the Home Assistant dashboard. Test that you can control the Shelly by toggling the switch (again, listen for the clunk). Test that you can control the EVSE by clicking the lightning icons on the dashboard next to the ‘Relay’ control: you should be able to send the EmonEVSE into sleep mode (purple display) and wake it up again (green display). By default the HASS seems to assume that the EVSE is asleep, so the first ‘wake’ command may not have any effect.
4.3 Set Up Automations
BOTH the ShellyEM AND emonEVSE need to be linked to the DSR event signal. To do this, two automations need to be created for each device.
NOTE: It is very important that in the below the state value is NOT capitalised (i.e. it should be ‘on’ not ‘On’).
In Home Assistant go to ‘Configuration’ -> ‘Automations’ and click the (+) icon to add a new automation.
For the first one the settings need to be as follows (you can hit ‘skip’ to bypass the natural language parser):
Trigger
Type: State
Entity: binary_sensor.dr_event_in_progress
From: off (without quotes, so that this is interpreted as a boolean value)
To: on
Actions
Type: Device
Device: Shelly EM (the name of your Shelly switch)
Action: Turn off Shelly EM (etc.)
Create a second automation to reactivate (close) the Shelly switch at the end of the event. Setting for this are as you would expect:
Trigger
Type: State
Entity: binary_sensor.dr_event_in_progress
From: on
To: off
Actions
Type: Device
Device: Shelly EM (…)
Action: Turn on Shelly EM (…)